If you
can put up wallpaper, You can install your own garage mural... Fast !
Once your receive your kit, Outdoor Mural Art
murals can be easily applied to any garage
door in only a few hours!
Once your receive your kit, Outdoor Mural Art
murals can be easily applied to any garage
door in only a few hours!
Your
Mural Kit will Include:
- Your completed mural panels
- The DVD installation guide
- Our specially formulated adhesive
- Razor knife with break-off blade
- Wallwhiz™ Smoother/Straightedge
- Large sponge & a 9" Roller cover
Supplies
you will Require: Large
portable working surface - Step ladder - Paint
roller & Tray
Bucket of warm water - Spirit level or Plumb bob
Bucket of warm water - Spirit level or Plumb bob
Mural Installation...
Our murals may be applied on any relatively flat surface. Keep in mind they will not adhere to stucco or to similar uneven, bumpy surfaces, but they will span over the recessed panels common on many garage doors.
Outdoor Mural Art applies to surfaces the same as any heavy weight wallpaper except there is no need soak the backing material, as a fast drying adhesive is applied to it right before putting up each individual panel.
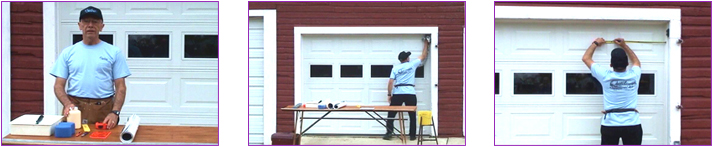
Once you have your table set up, and all your supplies handy, prepare the surface with a good cleaning and drying. Next a vertical guideline is drawn to help you align your first panel.
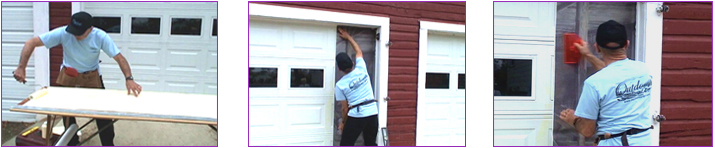
Using a roller or brush, a heavy coat of adhesive is applied to the back of one panel at a time and applied immediately to the door or wall surface, starting on the right side. The panel is smoothed out to ensure firm contact of the adhesive, and to flatten out any air bubbles.
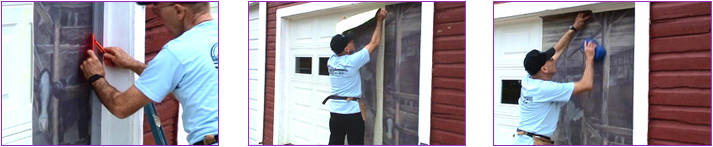
The mural edges are then trimmed to fit, as with indoor wallpaper. The next panel is then applied to overlap the first by a couple of inches. As the glue is setting you gently move, or 'slip' the second and following sheets to match up the pattern. Any remaining adhesive is sponged off as you complete each panel.
 Finally,
if the mural has been applied to a garage door, the mural is cut horizontally
along the joints between each garage door panel.
Finally,
if the mural has been applied to a garage door, the mural is cut horizontally
along the joints between each garage door panel.
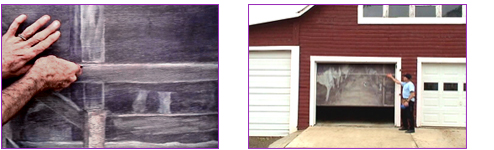
Once cut, the garage door will open as usual. Easy clean up with soap and water and you are done!.
Our murals may be applied on any relatively flat surface. Keep in mind they will not adhere to stucco or to similar uneven, bumpy surfaces, but they will span over the recessed panels common on many garage doors.
Outdoor Mural Art applies to surfaces the same as any heavy weight wallpaper except there is no need soak the backing material, as a fast drying adhesive is applied to it right before putting up each individual panel.
Once you have your table set up, and all your supplies handy, prepare the surface with a good cleaning and drying. Next a vertical guideline is drawn to help you align your first panel.
Using a roller or brush, a heavy coat of adhesive is applied to the back of one panel at a time and applied immediately to the door or wall surface, starting on the right side. The panel is smoothed out to ensure firm contact of the adhesive, and to flatten out any air bubbles.
The mural edges are then trimmed to fit, as with indoor wallpaper. The next panel is then applied to overlap the first by a couple of inches. As the glue is setting you gently move, or 'slip' the second and following sheets to match up the pattern. Any remaining adhesive is sponged off as you complete each panel.
Finally,
if the mural has been applied to a garage door, the mural is cut horizontally
along the joints between each garage door panel.Once cut, the garage door will open as usual. Easy clean up with soap and water and you are done!.
Protect your mural
from the Elements!
Once you have successfully installed your mural, to substantially prolong it's good looks and life, we recommend applying our optional UV Protective spray coating. Click here for more information.
Once you have successfully installed your mural, to substantially prolong it's good looks and life, we recommend applying our optional UV Protective spray coating. Click here for more information.
Questions about
installation? Need some more details?
Click here to view and download our printable PDF Installation Guide.
Click here to view and download our printable PDF Installation Guide.